OK so this may not fit in completely with Live Magic but I'm impressed nonetheless. I've had my Stinger for over 10 years and roughly every 2 years Suunto would require some cash to change the battery. I finally found a battery change kit with tool, and it took 3 days for delivery then 20 minutes to change the battery for € 25.00. With Suunto it's around £80 and takes a week!
http://en.smartinterface.de/artikel.php?id=24&kat=5
Tuesday 10 July 2012
Sunday 27 May 2012


Monday 14 May 2012
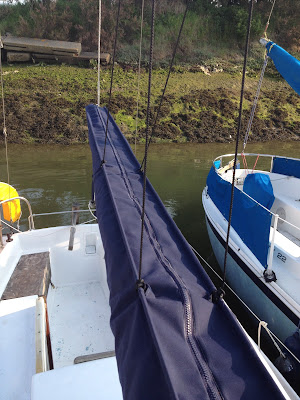
New Stack Pack
I finally got around to making my new sail cover and decided to make it a stack pack. I thought I'd post instructions here on how I did it since there isn't a lot of information on this subject on the web.


To make the stack pack, I used:
To begin, measure the length of your boom. This will be the cover length. Next measure the circumference of the flaked sail at 50cm gaps along its length. Although technically we'll only use the two end measurements its a handy cross check to make sure everything will fit. As I always say, measure twice, cut once!

When measuring the mast end, remember that when the sail is in the mast groove it is significantly higher than the rest of the sail.
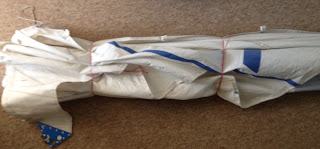 When measuring I tied my sail in a bundle on the floor to make measuring easier.
Don't measure this part since it will have a separate cover and will make the main bag too large. Instead, measure without the sail in the mast groove, this can easily be done at home.
Now we have the measurements for the cloth cut it's time for a model. Use 10:1 scale so 1cm is 1m to keep it simple. For mine this allowed me to use a4 paper but a3 will work for most sizes. The main bag body will be two halves, cut in opposite directions to reduce wastage. This means we end up cutting a rectangle then halving it on a diagonal. First, fold your paper in half length wise. Now all measurements from this centre line will be half of the circumference required. For the closure on top, you'll want a slightly wider gap at one end than the other, I used 10cm at the stern and 15cm at the mast, this is not a set figure, just use what looks right on your sail and boom. For larger boats make them a little bigger.
 Here comes some maths so concentrate...
Divide your sail circumference by 2 at each end. Divide your top closure sizes by 2 at each end. Subtract the half top closure numbers from their respective circumference numbers. This new number is the bottom half of the bag. On your paper, mark the boom length along your middle crease, adding 5cm (5mm at scale) for a seam at each end. Next, mark 2mm out at each end of the boom length for seam width. Now mark the figures you just worked out at each end and join these up to show the shape of the bottom half fabric. At this point is where the rods will go so we need to mark some extra space for the tubes. This will be Pi x the rod thickness plus some slack. For my 8mm rods I used 4cm. Mark this distance out at each end and join these with a line. Next, mark the top cover sizes out from these and join with a line. Finally add 2mm for another seam and join with lines.

At this point you should have a centre line then lines for seam, bottom, rod and cover at various distances out to form a sort of triangular shape. Remember when marking on the fabric you can measure these distances back to check them. Transfer the lines to one side of the fabric role for half of the shape. The other half should be marked in the opposite direction.
 These shapes can now be cut from the fabric roll.

Using the venture tape, fold the 5cm seams in at each end and stick down. Sew a line close to the fold and one close to the fabric end. Next, cut holes for the lazy lines. These will be 2 or 3 holes at sensible gaps along the length. They should be biased toward the mast since this is where most of the sail cloth will come down.
Cut a rectangle hole the width of the rod tube markings and 5-6 cm in length. Reinforce the sides by sticking rectangles of fabric and sewing in place.
 These reinforcing strips are just rectangles folded in half with venture tape to stick it in place. Use one on each side of the hole.
 Once the holes are complete, use venture tape to stick the rod tube ready for sewing. Place the tape on the outside of this seam to ensure it doesn't end up inside of the tube. Remember that the tube must end up outside of the bag when sewing - the tape goes on the inside. Sew along the length of the tube. I ended the seam either side of the holes since there would have been 6 layers of cloth and my machine would have struggled. This doesn't seem to have caused a problem though and not too much light should get in.
Next, tape and sew the zip into place. To do this, tape the outside of the zip to the outside of the bag. When you sew it and pull it back it will then look very neat. Sew one side of the zip at a time with the zip separated, halfway you'll need to move the zipper along otherwise it gets in the way, just lift the sewing machine foot briefly to do this.
Finally the bottom of the bag. My sail has slides so I aligned these with the bag and made more reinforced holes. Halfway between these I sewed webbing with slides into the seams to attach the bag. My sail now attaches through the holes in the bag. For sails with bolt ropes, you may need to add a section of thin cloth such as nylon which then slides into the boom with the sail rope.
For the mast bag, I measured the circumference of the sail about 50cm back from the mast and the height with the sail in the mast. I then drew a curved shape to accomodate this sail and cut the two halves. At the front of the bag I allows sufficient fabric to wrap around the mast and add a zipper at the front.
 To put this together I sewed the seam at the top (for the collar around the mast) and bottom first, then the one at the back (for the collar around the sail). Next sew the curve and finally add the zip down the front section. On mine I finished with some brass eyelets and used bungee cord and hooks to create a fastening under the sail.
Hope this helps someone, please leave a comment if you have any questions.


To make the stack pack, I used:
- 3m acrylic canvas (non coated)
- 1 reel of venture tape (double sided tape for sticking before sewing)
- 1m webbing to attach sail slides
- 6x sail slides
- 80cm zip
- 3m zip
- 1 cone of thread (uv resistant)
- 2x 3m x 8mm Fibreglass rods
- Sewing machine (most domestic ones will do)
- Denim needles for machine, 100/16 denim reinforced ones
- Tailors chalk for marking
- Sharp scissors
- Sharp craft knife/stanley knife/scalpel for cutting out shapes
To begin, measure the length of your boom. This will be the cover length. Next measure the circumference of the flaked sail at 50cm gaps along its length. Although technically we'll only use the two end measurements its a handy cross check to make sure everything will fit. As I always say, measure twice, cut once!

When measuring the mast end, remember that when the sail is in the mast groove it is significantly higher than the rest of the sail.

Don't measure this part since it will have a separate cover and will make the main bag too large. Instead, measure without the sail in the mast groove, this can easily be done at home.
Now we have the measurements for the cloth cut it's time for a model. Use 10:1 scale so 1cm is 1m to keep it simple. For mine this allowed me to use a4 paper but a3 will work for most sizes. The main bag body will be two halves, cut in opposite directions to reduce wastage. This means we end up cutting a rectangle then halving it on a diagonal. First, fold your paper in half length wise. Now all measurements from this centre line will be half of the circumference required. For the closure on top, you'll want a slightly wider gap at one end than the other, I used 10cm at the stern and 15cm at the mast, this is not a set figure, just use what looks right on your sail and boom. For larger boats make them a little bigger.

Divide your sail circumference by 2 at each end. Divide your top closure sizes by 2 at each end. Subtract the half top closure numbers from their respective circumference numbers. This new number is the bottom half of the bag. On your paper, mark the boom length along your middle crease, adding 5cm (5mm at scale) for a seam at each end. Next, mark 2mm out at each end of the boom length for seam width. Now mark the figures you just worked out at each end and join these up to show the shape of the bottom half fabric. At this point is where the rods will go so we need to mark some extra space for the tubes. This will be Pi x the rod thickness plus some slack. For my 8mm rods I used 4cm. Mark this distance out at each end and join these with a line. Next, mark the top cover sizes out from these and join with a line. Finally add 2mm for another seam and join with lines.

At this point you should have a centre line then lines for seam, bottom, rod and cover at various distances out to form a sort of triangular shape. Remember when marking on the fabric you can measure these distances back to check them. Transfer the lines to one side of the fabric role for half of the shape. The other half should be marked in the opposite direction.


Using the venture tape, fold the 5cm seams in at each end and stick down. Sew a line close to the fold and one close to the fabric end. Next, cut holes for the lazy lines. These will be 2 or 3 holes at sensible gaps along the length. They should be biased toward the mast since this is where most of the sail cloth will come down.
Cut a rectangle hole the width of the rod tube markings and 5-6 cm in length. Reinforce the sides by sticking rectangles of fabric and sewing in place.


Next, tape and sew the zip into place. To do this, tape the outside of the zip to the outside of the bag. When you sew it and pull it back it will then look very neat. Sew one side of the zip at a time with the zip separated, halfway you'll need to move the zipper along otherwise it gets in the way, just lift the sewing machine foot briefly to do this.
Finally the bottom of the bag. My sail has slides so I aligned these with the bag and made more reinforced holes. Halfway between these I sewed webbing with slides into the seams to attach the bag. My sail now attaches through the holes in the bag. For sails with bolt ropes, you may need to add a section of thin cloth such as nylon which then slides into the boom with the sail rope.
For the mast bag, I measured the circumference of the sail about 50cm back from the mast and the height with the sail in the mast. I then drew a curved shape to accomodate this sail and cut the two halves. At the front of the bag I allows sufficient fabric to wrap around the mast and add a zipper at the front.
Hope this helps someone, please leave a comment if you have any questions.
Monday 27 February 2012

Tuesday 31 January 2012
Sidelining
Today I ordered enough foam and vinyl to recover the v-birth on the boat. Hopefully I'll be going down this weekend to start working on fitting it and a new post will appear to show you all how I got on. For this project I am using closed cell foam from Hawke House which is self adhesive on both sides. This should make the whole job a lot more pleasant as there will be no glue, mess or fumes. On top of this I'll be adding unfoamed vinyl in a leather effect Ivory colour which should lighten the boat interior greatly compared to the dark blue carpet I currently have. The vinyl will also be wipe clean so will be much easier to look after.
Tuesday 17 January 2012
Upholstery
Although the cushions on the boat were not in terrible condition I recently decided to reupholster them to improve the interior. I went to Fabric Land and looked about for a reasonably priced fabric for the job. Although there are many specialist fabrics for this purpose, even some "specially for boats" they are generally very expensive and would end up costing more than the boat is worth. In the end I found a nice cotton fabric with navy and white stripes which will match the new hull colour.
 First things first, what will you need to upholster your cushions?

Once you have all of the required things you'll need to start cutting fabric for your first cushion. Don't be scared by strange shapes, just sit and think it through before you start. The one in the picture is from LM's forepeak and has a very odd shape but was easy enough to cover. I decided to put a zip in the end of the cushion to reduce cost and keep it out of sight. This means that I now have to squeeze the foam to get it in, and it takes a while to put on or take off the cover but it does look better.
The fabric I bought was striped accross rather than along which meant I had to sew it into a double width. This was easier than I thought it would be and produced very good results, but I spent a very long time pinning the sheets together to ensure that the pattern lined up as shown in this picture:

This helped all the way though the project - as with all of these types of project the mantra "measure twice, cut once" must be always in your mind. Once I had a sheet wide enough for a cushion, I laid it out on the floor and lined up the cushion. At this point it's important to decide how you would like the pattern to appear on the boat. I oriented the cushion in the picture so that the wider parts toward the stern which are more square had the stripes running accross the boat at right angles to the cushion. The sides were later matched so that the most visible part of the cushion is "correct" to the eye and the patterns then diverge further up where they won't be noticed. When the foam is lined up on the pattern and you're sure (check twice!!) that you want to go ahead, draw around the foam with chalk and ensure the line is tight against the foam edge. Baggy cushion covers are not a good thing so keep this line close and later you'll pin and sew along it. If a corner is lined up with a blue stripe, make sure the other side lines up to a blue stripe so that top and bottom are the same. Next, I cut strips of fabric for the sides which were 2 inches wider than the foam. Anyone good at sewing can cut this down but I like a wide margin when using the machine. The foam was 3 inches so I cut 5 inch strips and sewed them end to end matching the pattern. Once these were done I drew a line on each side 1 inch from the edge which would be used for pinning and sewing. This is where the plotter comes into it's own since it has lines in various places and so allowed me to quickly draw lines without measuring every time. Alternatively make a card ruler and cut it to the correct width, in this case 4 inches to measure from the opposite edge - a wide rule is easier to use than a narrow one.
 At this stage you should have 2 halves of fabric for a top and bottom as well as a long strip for the edge. Sit and pin the edge starting with the part that needs to match, lining up the chalk lines on the edge and the top/bottom as well as the pattern. Don't worry if the pattern doesn't match all the way along but try to make sure the noticeable part does which will be seen on the boat. In the picture above you will see the pins as I sewed using the machine. Make sure that you put them in with the head away from the machine so that you can remove them as you sew. If the pin head faces the needle you will have a terrible time removing it if it gets too close (trust me...).
Once you're all pinned and lined up, sew along the lines. This should be fairly straightforward as long as you work in sections and line up the cloth before sewing. I left the edge where the zip goes until last since this used a special side panel which I sewed a zip into beforehand. To do this, buy a zip of an appropriate length (in my case 24 inches since the cushions are 24 inches wide). Cut some thinner lengths for the side fabric since the zip will join two. Hold the zip so that the teeth, or top of the zip, are facing the outside pattern. The zip edge will line up with the side of the fabric. Pin the opposite side of the zip to keep the side you will sew free. Put on the zip foot to the sewing machine (this fits off to the side to allow you to sew in the right place). Line up the zip under this foot and sew the whole length of the zip. The ends may need to be finished manually before the whole panel is added to the cushion.
 This is the finished item, each cushion takes a good couple of hours to prepare to put aside a weekend or two for this project.

- Old cushions
- LOTs of pins (see picture, this is just about enough!!)
- A sewing machine
- Thread
- Fabric
- Good scissors
- A straight edge (a Portland plotter is good for this)
- A tape measure
- A chalk pencil or tailors chalk

Once you have all of the required things you'll need to start cutting fabric for your first cushion. Don't be scared by strange shapes, just sit and think it through before you start. The one in the picture is from LM's forepeak and has a very odd shape but was easy enough to cover. I decided to put a zip in the end of the cushion to reduce cost and keep it out of sight. This means that I now have to squeeze the foam to get it in, and it takes a while to put on or take off the cover but it does look better.
The fabric I bought was striped accross rather than along which meant I had to sew it into a double width. This was easier than I thought it would be and produced very good results, but I spent a very long time pinning the sheets together to ensure that the pattern lined up as shown in this picture:

This helped all the way though the project - as with all of these types of project the mantra "measure twice, cut once" must be always in your mind. Once I had a sheet wide enough for a cushion, I laid it out on the floor and lined up the cushion. At this point it's important to decide how you would like the pattern to appear on the boat. I oriented the cushion in the picture so that the wider parts toward the stern which are more square had the stripes running accross the boat at right angles to the cushion. The sides were later matched so that the most visible part of the cushion is "correct" to the eye and the patterns then diverge further up where they won't be noticed. When the foam is lined up on the pattern and you're sure (check twice!!) that you want to go ahead, draw around the foam with chalk and ensure the line is tight against the foam edge. Baggy cushion covers are not a good thing so keep this line close and later you'll pin and sew along it. If a corner is lined up with a blue stripe, make sure the other side lines up to a blue stripe so that top and bottom are the same. Next, I cut strips of fabric for the sides which were 2 inches wider than the foam. Anyone good at sewing can cut this down but I like a wide margin when using the machine. The foam was 3 inches so I cut 5 inch strips and sewed them end to end matching the pattern. Once these were done I drew a line on each side 1 inch from the edge which would be used for pinning and sewing. This is where the plotter comes into it's own since it has lines in various places and so allowed me to quickly draw lines without measuring every time. Alternatively make a card ruler and cut it to the correct width, in this case 4 inches to measure from the opposite edge - a wide rule is easier to use than a narrow one.

Once you're all pinned and lined up, sew along the lines. This should be fairly straightforward as long as you work in sections and line up the cloth before sewing. I left the edge where the zip goes until last since this used a special side panel which I sewed a zip into beforehand. To do this, buy a zip of an appropriate length (in my case 24 inches since the cushions are 24 inches wide). Cut some thinner lengths for the side fabric since the zip will join two. Hold the zip so that the teeth, or top of the zip, are facing the outside pattern. The zip edge will line up with the side of the fabric. Pin the opposite side of the zip to keep the side you will sew free. Put on the zip foot to the sewing machine (this fits off to the side to allow you to sew in the right place). Line up the zip under this foot and sew the whole length of the zip. The ends may need to be finished manually before the whole panel is added to the cushion.

Subscribe to:
Posts (Atom)